Custom bend families are sometimes used to reflect the specific requirements of the bender used for fabrication, and each has different nose and tail length requirements. The ACP conduit bends are sized conservatively to minimize adjustments needed when converting to custom families from common packages like SysQue, BendWorks, and Evolve, or to your own custom bend families.
Because projects can contain a large number of bends, converting them manually can be time-consuming. The Convert Bends tool streamlines this process, allowing you to quickly swap ACP bends for the custom families required for your workflow.
Converting Bends
Any ACP bend exported with the ACP conduit Solution may be easily converted into a custom bend family by following the steps below.
Load the bend family(s) to which the ACP bends will be converted into your Revit project. You can use any method to do this such as:
Using the Load Family
 tool in the Insert tab
Opening the bend family in the editor and loading it into the Revit project
Dragging the bend family file into the active Revit project
Only Conduit Fitting families with the Part Type set to Elbow may be used.
Open the view where the bends to be converted are visible.
ACP only converts bends that are visible in the active view.
Configuring the view to show certain bends at a time allows you to convert into different custom bend families as needed.
It is not recommended to use the Convert Bends tool and Inspect Solution tool in the same view as the view filters generated by these tools may conflict.
Navigate to the Augmenta tab and select the Convert Bends
 tool in the Edit panel.
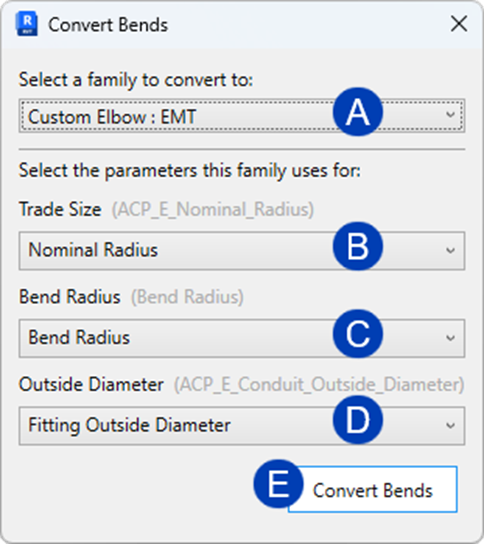
 In the Convert Bends window, select the bend family to which you’d like to convert the ACP bends from the
 dropdown at the top.
 Map the parameters of the bends used by ACP to the corresponding parameters of your loaded bend family. This ensures the bends will have the correct properties after conversion.
 Trade Size,
  Bend Radius, and
  Outside Diameter are the needed parameters in the Convert Bends window.
The tool will suggest parameters of the loaded bend family which match the required parameters.
The suggested parameters for mapping may need to be corrected because bends are loadable families, the parameters may differ from one family to the next.
Click the
 Convert Bends button.
Temporary view filter during conversion
A temporary view filter is applied to the view during conversion. This temporary view filter highlights the ACP bends in red while the converted bends are highlighted in blue. Notice at the start of the conversion process that the ACP bends are highlighted in red. Each one changes to blue during the process as they’re converted into a custom bend.
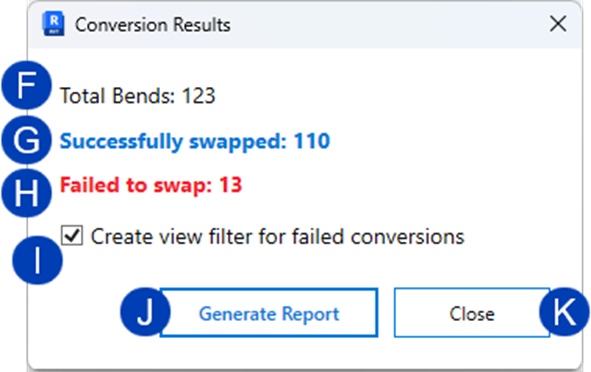
After the tool completes its process, the Conversion Results window will appear. It displays the following information:
 Total Bends - Total number of bends in the Revit model
 Successfully swapped - Number of bends converted
 Failed to swap - Number of bends that the tool wasn’t able to convert.
 These non-converted bends are scheduled in the ACP Non-Converted Bends scheduled.
By default, the
 Create view filter for failed conversions checkbox is selected.
 This view filter permanently highlights the bends in red that the tool wasn’t able to convert.
This view filter is applied only to the view that was active when you used the Convert Bends tool.
You can deselect the checkbox if you don’t want the view filter to be applied.
Click the
 Generate Report button to create the ACP Non-Converted Bends report and close the Conversion Results window.
This will close the Conversion Results window, which also removes the temporary view filter (Non-ACP Conduit Fittings) applied to the view.
The ACP Non-Converted Bends report is only generated once. This button will change to Open Report
 if you’ve already generated the report previously.
Or Click the
 Close button to close the Conversion Results window without generating the report.
Closing the Conversion Results window also removes the temporary view filter (Non-ACP Conduit Fittings) applied to the view.
Working with the ACP Non-Converted Bends schedule
The Convert Bends tool significantly reduces the time required to convert hundreds of bends in your Revit model. However, because the lengths of custom bends vary and take up different amounts of space, some bends may not be successfully converted by the tool. Any bends in the Revit project that weren’t converted will appear in the ACP Non-Converted Bends report. This report is the schedule that’s generated if you click the Generate Report button before closing the Conversion Results window.
It is recommended that the Convert Bends tool is used in a view where all of the bends needing conversion are visible, such as a 3D view with the entire site visible.
The Convert Bends tool only converts ACP bends visible in the view where it’s used, if the tool was used in a view where not all bends are visible (such as a plan view), the ACP Non-Converted Bends report may display a significant number of non-converted bends.
Because the ACP Non-Converted Bends report is a Revit schedule, you can use it to locate each bend that failed to convert so that any final edits and the manual conversion may be completed.
Follow the steps below: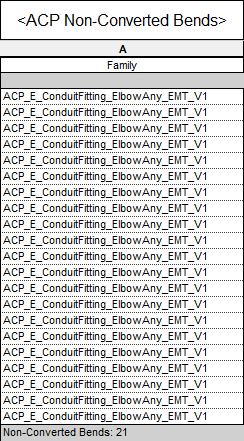
Select a single non-converted bend to modify
Each row in the schedule represents a single non-converted bend.
In the Modify Schedule/Quantities tab, select the Highlight in Model
 tool.
tool.This will locate and highlight the bend in different views.
If you have the view filter for failed conversions applied to the view, the bend will be highlighted in red.
Manually update the bend to use the required custom bend family.
You may also need to modify the surrounding conduit to convert the bend.
Repeat the steps above for each of the non-converted bend.
Note the count at the bottom will update as each bend is successfully converted.
ACP Conduit Fittings view filter
The ACP Conduit Fittings view filter with it’s associated overrides may be applied to any view in two ways:
Using the ACP-Plan view template
Using the Convert Bends tool
Using the Convert Bends tool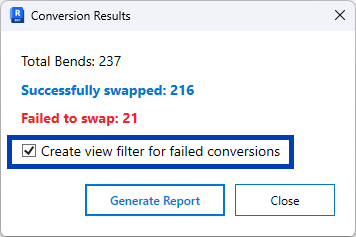
In the Conversion Results window which appears after the Convert Bends tool finishes its process, select the Create view filter for failed conversions checkbox.
This checkbox applies the ACP Conduit Fittings view filter to the view to highlights the bends in red that the tool wasn’t able to convert.
This view filter is applied only to the view that was active when you used the Convert Bends tool.
Using the ACP-Plan view template
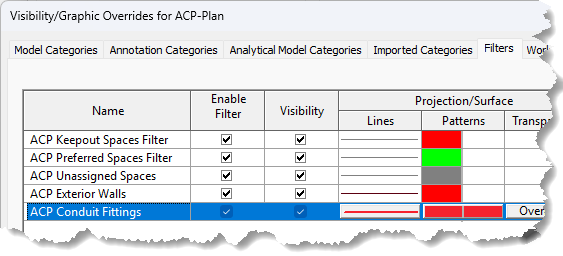
The ACP Conduit Fittings view filter is also applied the ACP-Plan view template when the Create view filter for failed conversions option is checked.
The ACP Conduit Fittings view filter will then be visible in any view which has the ACP-Plan view template applied, even when the Conversion tool was not used directly in that view.