Keeping your ACP Revit add in up to date ensures access to the latest features and continued compatibility with your Revit workflows. This includes the data ACP uses in the study's Conduit Schedule which is part of the Schedule Inputs, as well as the model data imported as part of the Design Inputs. Using an outdated version may result in Revit project data being interpreted incorrectly, which can lead to errors throughout the ACP process.
This guide walks you through the steps for verifying and updating the ACP Revit add-in versions.
Download updates via the ACP add-in window in Revit
The ACP Revit add-in serves as the bridge between the ACP Workspace and Revit. Because it’s installed locally on your machine, the add-in is able to identify the current version of your ACP Workspace, and determine if your Revit add-in is up to date for that version.
1. Check for updates.png)
If your ACP Revit add-in needs to be updated, the Add-in is out of date window will be displayed when you launch and log in to ACP from within Revit by following the steps below:
In Revit, navigate to the
 Augmenta tab.
Click the
 Launch ACP button.
Sign in using your credentials.
Updates contain new features and bug fixes that are critical to the use of ACP in your Revit project. Using an outdated ACP Revit add-in may cause issues in ACP processes. To prevent this, the Add-in is out of date window will only be cleared after you download the updated ACP installer and install it.
2. Download the updated ACP installer
You can download the installer in the ACP window by clicking the  Download installer button in the Add-in is out of date window.
PRO TIP:
If there’s a new update to the ACP Revit add-in, the
About tool in the Augmenta tab will have a red dot.
The message A new version of ACP is available will be displayed in the About window.
Click the Download button to download the updated ACP installer.
3. Install updates
Once downloaded, follow the steps in the Installing ACP guide to install the updates.
Find & download updates via web browser
The latest available ACP Add in is always available for download when ACP is accessed through a web browser.
Because ACP is not connected to Revit, it cannot detect whether the Revit add in is up to date. For this reason, the download button is always available and may be used at any time to download the latest installer.
Keep in mind, you may already have the latest version of the Revit add-in installed, so it is generally better to check for updates directly from the Revit add-in (See previous Section). However, accessing the ACP download via your web browser is an available option if the Revit Add-in is not available for any reason.
1. Navigate to your ACP workspace in your browser
You can access your Workspace using: 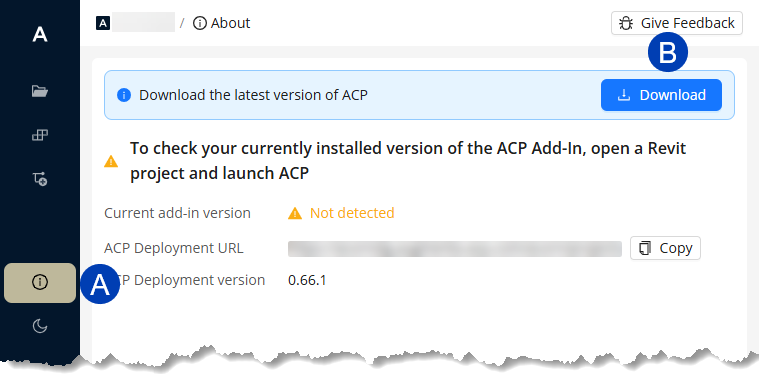
The link in your Welcome email.
Your Workspace link saved as a bookmark.
Your Workspace installed as a web app in your preferred browser (*Recommended).
2. Download ACP updates
Sign In using your credentials, when prompted.
Navigate to the
 About section on the site.
 Locate the message stating: “Download the Latest version of ACP”.
Proceed to click the
 Download button.
3. Install updates
Once downloaded, follow the steps in Installing ACP to install the updates.
This is because as updates to the platform are made, corresponding updates to parameters, views, and system settings may need to be updated in the Revit projects as well.
Refer to About items created during initialization.
After updating the ACP add-in, you may also need to Reinitialize ACP in any ongoing Revit projects. This allows for any new parameters and other system updates to be properly applied to your current project.