Schedule Inputs in ACP define the Source and Destination for a Raceway, as well as its specifications.
Two schedules are used in ACP:
Conduit Schedule: Specifies the Run ID, Source, Destination, System, and guidance for each raceway (if applicable). It also references the Feeder ID in the Feeder Schedule.
Raceways may be scheduled with Source and/or Destination elements that aren’t placed in the Revit project yet. The Schedule Run tool may be used to place these elements in the Revit project from the Conduit Schedule.
Feeder Schedule: Lists conduit size and number of parallel runs for each Feeder ID.
Data for these schedules can be imported from an external CSV/XLSX file or manually created in the ACP study in the Schedule Inputs sub-tab of a Study view.
Please Note:
Once the solutions have been generated, these schedule columns are added to the Revit project as properties of the conduits exported from ACP. These are reflected in the ACP Conduit Run Schedule, created in the Revit project during Initialization, as well.
ACP supports multiple runs containing the same source, destination, system and feeder ID.
Because the Schedule Inputs sub-tab connects to the active Revit project, they are only accessible when ACP is launched through an open Revit project. When accessing the study through a web browser, the following message will appear:

PRO TIP: For more space while you create Schedule Inputs, expand the schedule by hovering over the split-screen then clicking the corresponding arrow
.
Manually create Input Schedule data within ACP
Manually creating Input Schedule data within ACP requires that you launch it from the ACP Revit add-in. This is because ACP uses the data in the active Revit project, verifying information such as Panel Name, ACP_E_Fixture_ID, and ACP_C_Enabled parameters. This makes this process considerably less error-prone compared to externally creating the Input Schedules.
Refer to the sections below for the step-by-step process of manually creating Input Schedule data within ACP.
Create a Feeder ID in the Feeder Schedule
A Feeder ID uniquely identifies a set of conduit specifications which may be used for multiple Raceways defined in the Conduit Schedule. It represents the number of Parallel Runs and the Conduit Size to be used for the Raceway(s) referencing it.
Because Raceways in the Conduit Schedule reference Feeder IDs in the Feeder Schedule, it is recommended that the Feeder Schedule be created first to avoid errors.
Follow the steps below to manually create Feeder IDs in the Schedule Inputs sub-tab of a study view.
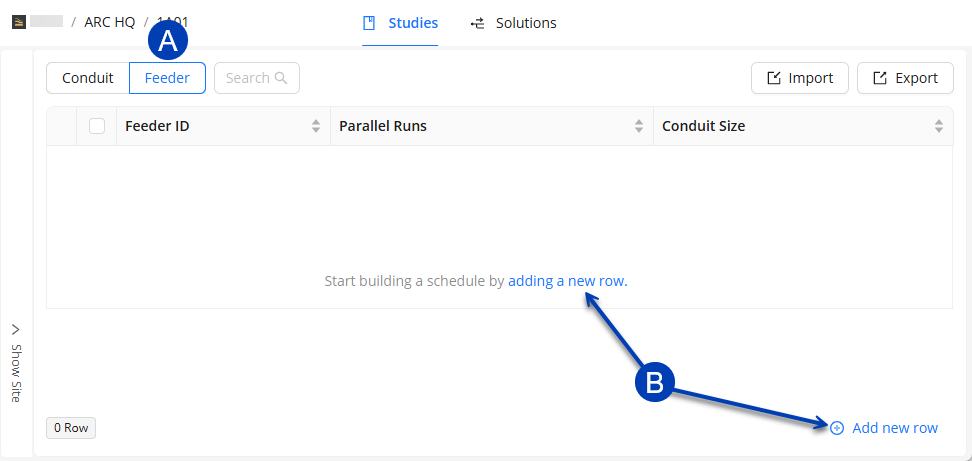 In the
  Feeder Schedule tab, add a new Feeder ID.
 Click the
 Add new row button at the bottom of the Feeder Schedule.
 If the Feeder Schedule is empty you may select the option of adding a new row.
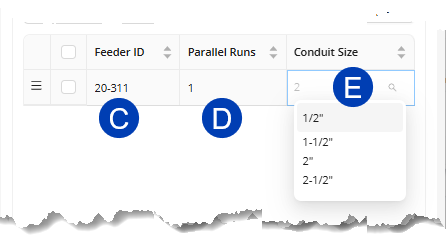 Fill in the
  Feeder ID.
Any unique combination of letters, numbers, and symbols.
Specify the number of
 Parallel Runs.
Must be a positive whole number.
Select
 Conduit Size.
Double click in the box to bring up the drop-down list of all conduit sizes supported by ACP.
Or enter a number to filter the dropdown list, and then select the correct size.
Repeat the steps above to create as many Feeder IDs as needed. All changes are saved automatically.
Create a Raceway in the Conduit Schedule
In ACP, a Raceway constitutes the Source, Destination, and the conduit that runs between them. The specification and routing preferences for each Raceway in an ACP study are defined in the Conduit Schedule.
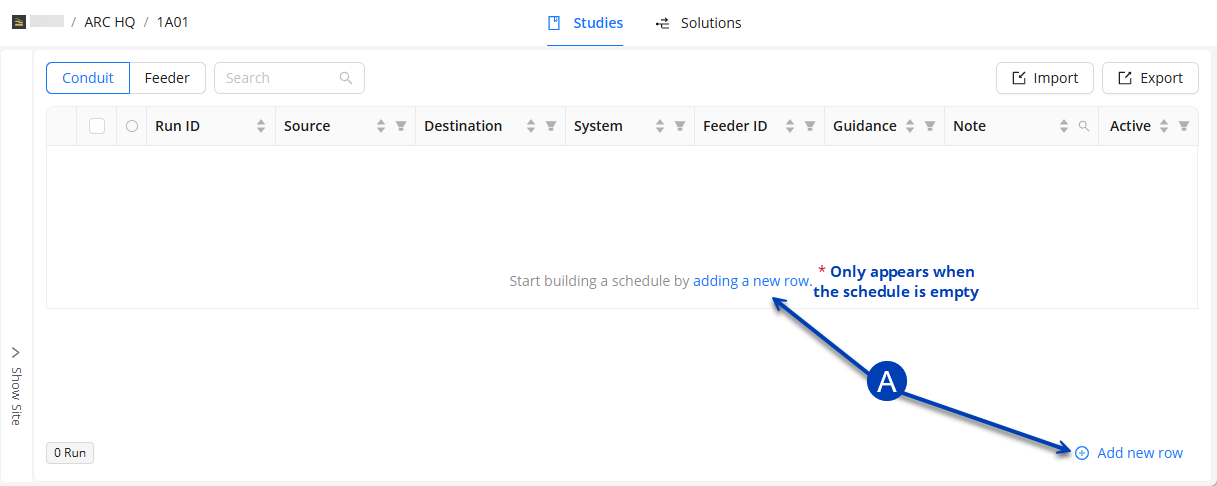 Follow the steps below to create the Conduit Schedule in the the Schedule Inputs sub-tab of a study view.
Add a new Raceway.
Click the
Add new row button at the bottom of the Conduit Schedule. If the Conduit Schedule is empty you may select the option of adding a new row.
Fill in the Run ID.
Any unique combination of letters, numbers, and symbols. (Does not reference any Revit information)
ACP will auto-step the next row based on the last digit of the previous Run ID
IE: If the previous Run ID was HR-1, the next Run ID will automatically be named "HR-2”
This name may be overwritten at any point.
 Assign a Source and Destination.
Double click in the box to show the dropdown list of all Electrical Equipment/Electrical Fixtures in the project.
Or enter the name, even partially, of the Source/Destination to filter the dropdown list then select the correct name from the drop-down list.
Fill in the System.
Any combination of letters and numbers. (Does not reference any Revit information)
This information is reflected in the ACP Conduit Run Schedule after you Export Solution(s) from ACP into the Revit Project.
Assign a Feeder ID.
Double click in the field to show the dropdown list of all Feeder IDs from the Feeder Schedule.
Or enter the Feeder ID, even partially, and select the correct one from the filtered dropdown list.
The Note field may be used to track any additional information for each Raceway as needed.
This field may remain blank.
Set the Active toggle.
This is turned on
.png) by default. You can click the toggle to turn it off
by default. You can click the toggle to turn it off .png) and exclude it from the solution generation process.
and exclude it from the solution generation process. If you intend to use the same Conduit Schedule for different studies in the same ACP Project, this allows you to choose which Raceways should be routed within each study.
Repeat the steps above to create more Raceways. All changes are saved automatically.
Raceway Status
The status becomes active once the Floors have been set up within the study, and will change as the Segments and Routes are created within the Model Viewer.
The Status may be any one of the following:
 Error - Raceway has errors preventing routing
.png) Run not active - Inactive raceway
Run not active - Inactive raceway.png) Proposed route - Raceway not routed, proposed route available
Proposed route - Raceway not routed, proposed route available.png) No route found - Raceway not routed, proposed route not available
No route found - Raceway not routed, proposed route not available.png) Routed - Raceway has been routed and segments are assigned.
Routed - Raceway has been routed and segments are assigned.
Modify Raceways within the Conduit Schedule
During the schedule building process you may find that you need to select, modify, filter, duplicate, or even delete information from your schedule. All of these actions can be managed directly within the ACP schedule using built-in tools designed to make editing faster and more intuitive.
Schedule Controls
Below are the table controls in the Conduit Schedule and Feeder Schedule tabs.
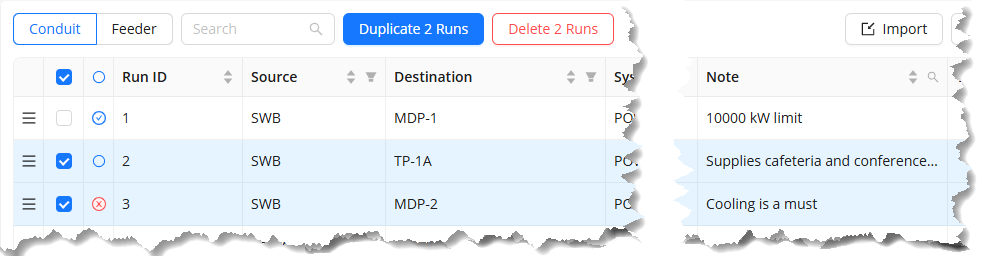 Select run(s): Allows user to select one, multiple, or all Run IDs/Rows within the schedule
 .png)
Duplicate: Create an exact duplicate of the selected Row(s), with a the next specified Run ID.
Delete: Delete the selected Row(s) from the schedule.
Modify a field: Update any of the data of a selected row(s)
When multiple rows are selected in a schedule, any data entered in one field, will automatically apply to all selected rows.
Select all: The checkbox in the top left hand corner of the schedule (next to the schedule headers).
Click to select all rows within the table to duplicate, delete, or modify a field for all.
.png)
Move: Click to drag the row to a different location within the table.
.png)
Sorting: Sorts all rows in the table by either the ascending or descending order of the column’s values.
.png)
Filtering: Enables users to filter the table view based specific rows in the list based on selected values in the column.
.png)
Note Search: Filters visible Run IDs by matching the entered text against the Note field in the current schedule.
.png)
Link to Element
.png) : Functions similarly to Revit’s Highlight in Model
: Functions similarly to Revit’s Highlight in Model .png) feature, allowing you to locate the corresponding element in the Revit model from the Source and Destination fields.
feature, allowing you to locate the corresponding element in the Revit model from the Source and Destination fields.Error Display: Hovering over the red icon
 displays the full error message along with suggestions for resolution.
Import Input Schedule data
Information for the Input Schedules can be imported from either an externally created CSV/XLSX file or from a previous study.
WARNING:
Importing a CSV/XLSX file will replace all existing rows, including those that were previously imported or manually created.
Schedules created outside ACP are often prone to errors because they rely on manual entry.
If you import a Conduit Schedule containing Feeder IDs prior to creating or importing the Feeder Schedule, ACP will display display the following error
in the Feeder ID Field of the Conduit Schedule:
Missing Feeder ID, <Feeder ID> doesn’t exist in the Feeder Schedule.
See the article Errors and Warning in Schedule Inputs for more information, and for ways to resolve this error.
Import an external CSV/XLSX file
Depending on your organization’s workflow, you may have Schedules created as spreadsheets external to Revit. These externally-created schedules, both Conduit Schedule and Feeder Schedule, may be imported into an ACP study.
The process of importing an external CSV/XLSX into an ACP study as a Conduit Schedule or a Feeder Schedule is outlined below.
Import file
.png) In the Schedule Inputs sub-tab of a Study view, navigate to the
In the Schedule Inputs sub-tab of a Study view, navigate to the  Conduit Schedule or Feeder Schedule tab, depending on the Schedule you want to import.
Click the
 Import button, and then
  Import CSV/XLSX.
From the Import CSV/XLSX window, click the Upload .xlsx, .xls, or .csv file button.
This will open your computer’s file explorer.
In the file explorer, select and open the CSV or XLSX file to be imported.
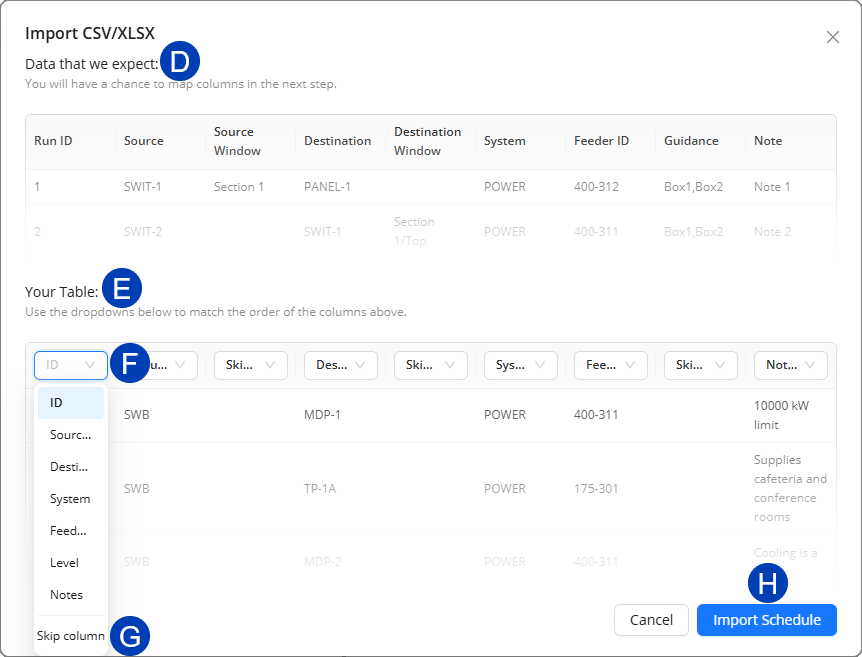 Map Headers
The Import CSV/XLSX window displays the  Data that we expect for the Schedule.
If the headers in your existing schedule don’t exactly match ours, they can be mapped accordingly.
From the
 Your Table section of the Import CSV/XLSX window, use the
  drop down list for each column header and select the corresponding header from your schedule.
 If any field needed for the Schedule is not present in your CSV/XLSX file, you may choose
 Skip column, and provide the data later in the process.
Finish Schedule Import
Once all of the headers are correctly mapped, select the
 Import Schedule button.
Import from a previous study
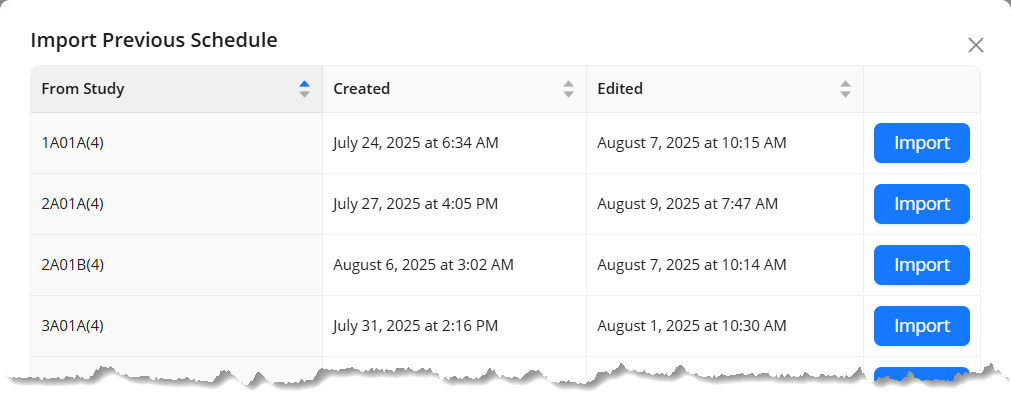 Existing Input Schedules in the ACP project, regardless of the study Type (Automatic or Interactive) they were previously used in, may be imported into the current study.
The process to import an existing schedule from a previous study is the same for both Conduit Schedules and Feeder Schedules :
In the Schedule Inputs sub-tab of a Study view, navigate to the Conduit Schedule or Feeder Schedule tab, depending on the Schedule you want to import.
Click the Import button.
Select the option to Import Previous Schedule.
This option only appears after the a study has been finalized by clicking the Generate button
 .
.This will open the Import Pervious Schedule window.
Click the Import button next to the study you’d like to use the Input Schedule from.
The previous schedule will be loaded, and may be modified.
Next Steps
ACP provides tools to streamline placing and scheduling electrical elements. Refer to the next article, Placing Electrical Elements with ACP.