Because the visibility controls in the ACP-Import view controls what geometry does and does not get imported into an ACP study, understanding what geometry is visible within that view, and how ACP will understand and translate that geometry is a crucial step in setting up the ACP-Import view.
Reviewing and minimizing the visible geometry will help to avoid these major issues:
Lag during navigation and model interactions
Longer import duration of Site Data, which may trigger complete import failure
Detection of false clashes
Longer conduit generation times or complete generation failures due to time out
Use the Inspect Model tool during ACP-Import view setup to review the geometry visible in the model, and identify what can safely be removed before importing into ACP.
The Inspect Model tool is designed to be used with the ACP-Import view.
It DOES NOT change the visibility settings of the view.
To adjust the visibility settings, use Revit’s native controls, such as Model Categories, View Filters, Worksets, and Revit Link Display Settings.
Panel Overview
The Inspect Model panel has two sections:
Model Visibility list - Displays the main and linked models in the Revit project, along with their load status and Link Type.
Elements Summary - Displays a summary of the elements, organized by category groups, within the selected model in the Model Visibility list.
The two tabs, Unexpected Categories and High-Detail Elements, report on whichever model is selected in the list above.
Launching the tool
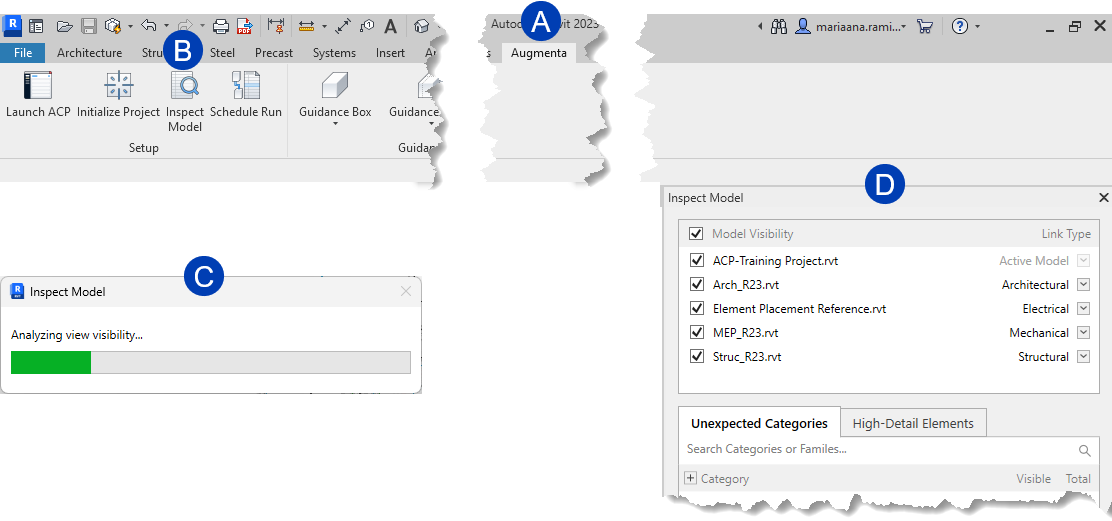 To launch the Inspect Model tool, follow the steps below.
Navigate to the
 Augmenta tab.
In the Setup panel, click the
 Inspect Model tool.
 If the ACP-Import view is not open and active, ACP will open the view.
The tool then analyzes the view’s current visibility settings for Unexpected Categories.
This may take a moment while it gathers information about your model and any links.
The
 Inspect Model pop-up will appear, showing the progress of the analysis.
Once done, the
 Inspect Model panel will appear, docked to the right side of the screen by default.
It can be undocked, then redocked to another location or left floating.
The Model Visibility list
The Model Visibility list displays the active and linked models in the project.
It provides the following details and controls of each model:
Set the Link Type
The Link Type specifies the trade (IE: Structural, Architectural, Mechanical, Electrical, or Plumbing) of a linked model. This determines which elements are suggested as Unexpected Categories for that model, helping you know where to begin the review of each model. For example, a Structural model will not typically have elements in the Ductwork category group.
ACP initially infers the Link Type for each linked model. However, it may not always be correct, in which case the Link Type should be manually set.
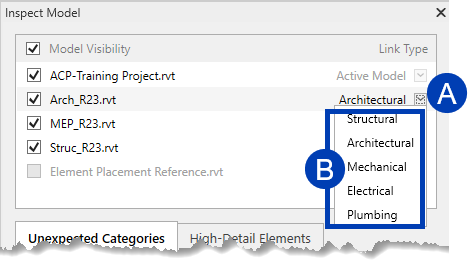 Follow the steps below:
In the Model Visibility list, click the
 Link Type dropdown for the model.
From the
 dropdown list, choose the Link Type that the model best represents.
Exceptions
Depending on the model’s role and load status in the project, a model’s Link Type may not be modifiable. Instead, the Inspect Model tool automatically assigns the following link types:
Active Model - Indicates the main model of the Revit project.
Not Loaded - When the model is added to the Revit project, but is not currently loaded.
Control Model Visibility
.png) Each model in the list has a visibility checkbox which can be used to control the visibility of each model without needing to open the Visibility/Graphic Overrides. This make it easier to understand the visible geometry within each model.
Each model in the list has a visibility checkbox which can be used to control the visibility of each model without needing to open the Visibility/Graphic Overrides. This make it easier to understand the visible geometry within each model.
By default, the visibility of each model follows the current setting when you launched the tool.
To display a model’s elements in the view,
 select the checkbox for the model.
To hide a model’s elements from the view,
 deselect the checkbox for the model.
The checkbox in the
 header controls the visibility of every model in the list, including the active model.
Because
 unloaded links cannot be analyzed, their checkbox stays unchecked and grayed out until the link is loaded into the project.
Elements Summary
The Elements Summary provides a count of the elements within the highlighted model in the Model Visibility list. This summary provides a high-level view of the amount and complexity of geometry in the ACP-Import view through its two tabs, Unexpected Categories and High-Detail Elements.
Review Unexpected Categories
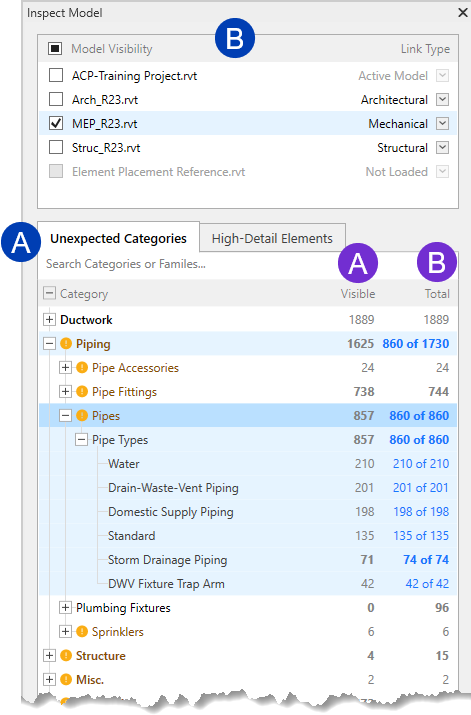 The Unexpected Categories tab lists every element present in the highlighted model in the Model Visibility list. The elements are displayed in a category tree organized from top to bottom by ACP category group, Revit category, family, and type. The number of elements at each level is displayed under the
  Visible and
  Total columns.
Visible - The number of elements visible in the model.
Total - The number of all elements in the selected model, both visible and hidden.
Categories which aren't typically expected for the model's Link Type are flagged in yellow with a warning icon  . Because these recommendations are based on the Link Type, confirm the correct Link Type before reviewing this list.
Below are the steps and guidelines to review Unexpected Categories:
Within the Inspect Model panel, navigate to the
 Unexpected Categories tab.
Select a model to review from the
 Model Visibility list.
Ensure the Link Type of the selected model is correctly set.
Expand a category group to review it in more detail, down to individual families and types.
ACP Category Groups > Revit Category > Family > Type
Review all categories, paying specific attention to those flagged with the Warning icon
.Select each group to highlight all of the elements in the view.
As groups are selected, the Total will display the number of highlighted elements at each level of the tree.
It may be easier to review each model if the visibility of the others is unchecked (turned off).
Adjust the visibility for elements that are not needed for routing and coordination using Revit-native visibility controls.
IE: Model Categories, View Filters, Worksets, and Revit Link Display Settings.
To update the report after visibility has been updated, close and reopen the panel.
Scan for High-Detail Elements
The High-Detail Elements tab helps identify geometry-heavy categories and families that may slow down the import and processing of the Revit model in an ACP study. Reviewing categories by triangle count (Total Tris), can help identify elements to remove or simplify prior to import.
When scanning for High-Detail Elements, the Inspect Model tool counts these triangles and reports the total.
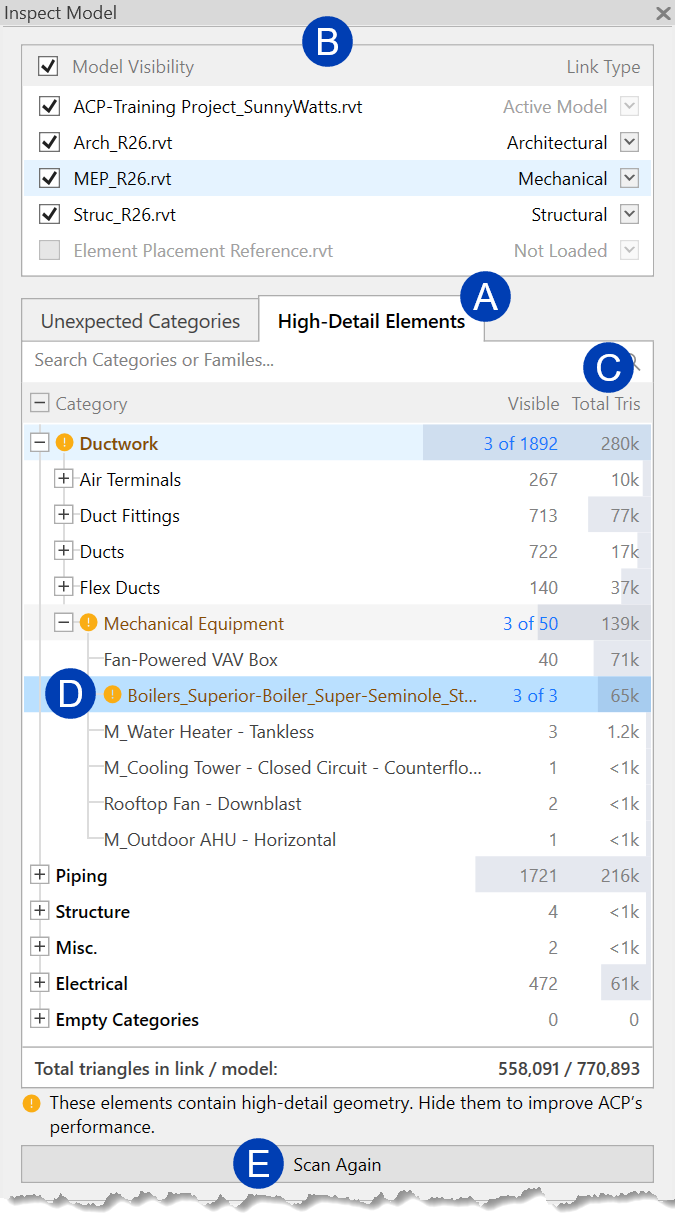 Below are the steps to scan for and review High-Detail Elements:
In the Inspect Model panel, navigate to the
 High-Detail Elements tab.
Click the Scan for high-detail elements button.
This will scan the geometry of all the loaded and visible links and count their total triangle.
Select the specific model to review from the
Model Visibility list.Expand a category group to review it in more detail, down to individual families.
ACP Category Groups > Revit Category > Family > Type
Review categories with a high
 Total Tris count.
If a single family has
 over 10k Total Tris, it will flagged in yellow with a warning icon .
Select each group to highlight all of the elements in the view.
It may be easier to review each model if the visibility of the others are unchecked (turned off).
Adjust the visibility for elements that are not needed for routing and coordination, using Revit's visibility controls.
IE: Model Categories, View Filters, Worksets, and Link Overrides.
Update the results of the High-Detail Elements report by clicking
 Scan Again at the bottom of the tab.