ACP uses electrical elements categorized as Electrical Equipment and Electrical Fixtures as sources and destinations of the specified raceways in the study, from which ACP generates the conduit runs. To streamline the process of placing these elements in your Revit project and scheduling them in your ACP Study, you can use the Schedule Run ![]() tool. This tool can be accessed from both the Conduit Schedule in the ACP study and within the Revit project.
tool. This tool can be accessed from both the Conduit Schedule in the ACP study and within the Revit project.
The Schedule Run tool supports three workflows:
Because the Schedule Run
tool works with both the Revit project and the Conduit Schedule in an ACP study to keep them synchronized, the associated ACP study must be open via the add-in before you use this tool.
If you select this tool in Revit without an ACP study open via the add-in, you will see the error Application ACP-revit: No Study open in ACP.
To resolve this, launch ACP and navigate to the study and Conduit Schedule you are going to work in.
Define the raceway in the schedule first
 When creating schedule inputs, ACP reads all electrical elements which may be used as either a Source or Destination for each Run ID from your Revit project. These elements are identified by either Panel Name or ACP_E_Fixture_ID, depending on their category.
There may be instances where an electrical element is not placed in the Revit project but is specified in the Conduit Schedule. For example, electrical engineering teams often place major electrical equipment in the Revit project but rarely include electrical fixtures like Home Run J-Boxes. However, these fixtures may already be specified as sources and destinations in the Conduit Schedule prepared by the project’s lead planner.
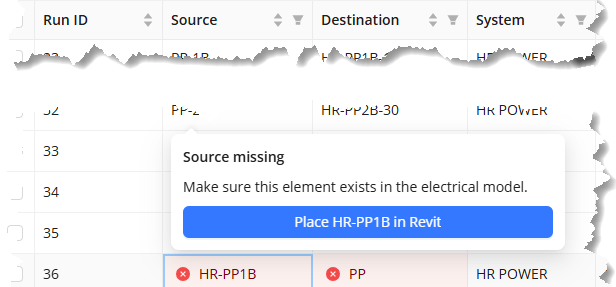
Whether the Conduit Schedule is imported or manually created in an ACP study, the electrical element listed in Conduit Schedule but not found in the Revit project will be highlighted in red with an X  button. Clicking this button will display the error [Source/Destination] missing.
Any electrical element with this error can be placed in the Revit project by following the steps below.
Click the X
button in the source/destination.In the error message pop-up, click the Place [name] in Revit button.
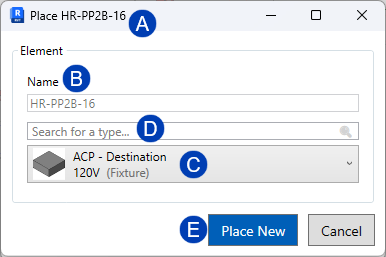
The ACP window will be minimized and the
 Place [name] window will open in the active Revit project with the
  Name field filled.
Open the view you want to use to place the electrical element.
This is easiest to do in a plan view.
In the Place [name] window, select the family and type of electrical element you want to place from the
 dropdown.
 Or use the
 Search field to find the family and type you want to place.
Click the
 Place New button.
Click the location in the view where you want to place the electrical element.
You may edit the properties of this electrical element in its Properties palette.
PRO TIP: The Elevation from Level should be set to the correct height prior to placement so that unnecessary bends in the Conduit Run are avoided to ensure efficient routing.
Return to the ACP study and you’ll notice the error has been resolved.
The ACP_C_Enabled property for the element being placed will be automatically checked when placed using the tool, to prevent the error Device disabled from appearing.
Repeat these steps for other sources and destinations that aren’t placed in the Revit project yet.
Place electrical elements in the Revit project first
Electrical elements which have already been placed in the Revit model may be used as sources and/or destinations when scheduling new raceways in the Conduit Schedule of an ACP study. Scheduling new raceways may be done directly within the Revit model using the Schedule Run tool. This tool is also used to fill in the other required information to schedule raceways.
The Feeder Schedule must be created before using the Schedule Run
A valid Feeder ID must be selected prior to completing the schedule information using the Schedule Run tool.
This field gets populated from the Feeder Schedule and may not be manually entered.
To schedule raceways with existing electrical elements in your Revit model as sources and destinations, follow the steps below:
Select a Source element
In the Revit project, navigate to the Augmenta tab.
.png)
Launch ACP and navigate to the to the Conduit Schedule of the desired study.
Return to the Revit project and select the Schedule Run
tool in the Setup panel. In the Schedule Run window, select a Source either from the dropdown, directly in the model, or use the last destination.
In the Source section, click the  dropdown and select from the options.
Or use the
 Search field to find the electrical element.
Open a view where the source is visible.
In the Source section, click the
 Select button.
The Schedule Run window will be minimized.
Select the electrical element in the view.
If you’re chaining electrical elements, i.e. the destination of the current raceway is the source of the next, use the
Last Dest. button so the previous destination becomes the current source.
This button will be enabled when you’ve previously scheduled elements without closing the Schedule Run window.
Select a Destination element
.png)
In the Destination section, ensure that the
 Existing radio button is selected.
Select an existing destination either from the dropdown or directly from the model.
Click the  dropdown and select from the options.
Or use the
 Search field to find the electrical element.
Open a view where the source is visible.
In the Destination section, click the
 Select button.
The Schedule Run window will be minimized.
Select the electrical element in the view.
.png)
Assign Feeder ID and System to the raceway
In the Run section of the Schedule Run window, select a Feeder ID from the
 dropdown.
This comes from the Feeder Schedule which needs to be prepopulated in the ACP study.
Enter a System name to create it and assign it to the raceway.
Or select a System from the
 dropdown.
Click the
 Schedule button.
The raceway will be added as the next Run ID at the bottom of the Conduit Schedule of the ACP study.
The Schedule Run tool will ensure the ACP_C_Enabled property for any selected element is checked, to prevent the error Device disabled from appearing.
The Schedule Run window will remain on the screen so you can schedule more raceways.
Repeat the steps above to schedule additional raceways using elements already placed in the Revit model.
Place and define Schedule Inputs directly in the Revit project
Many electrical elements used as destinations for raceways are the Home Run J-Boxes which feed the final end devices for a given circuit. These J-Boxes are often placed in the Revit model after their sources, which are typically Electrical Equipment, have been placed. The process of placing these Home Run Destinations can be streamlined with the Schedule Run ![]() tool within the Revit project. This tool lets you place the new destination elements in the Revit model while simultaneously scheduling the full raceway data directly ACP study’s Conduit Schedule.
tool within the Revit project. This tool lets you place the new destination elements in the Revit model while simultaneously scheduling the full raceway data directly ACP study’s Conduit Schedule.
Place a new Destination element
To place a new electrical element in the Revit model and use it as the Destination of the raceway you’re scheduling, follow the steps below:
.png)
Open the view you want to use to place the new destination element.
In the Schedule Run window, select the Source for the raceway.
Select the
 New radio button in the Destination section.
Click the
 dropdown and select the family and type of the element you’d like to place from the options.
Or use the
 Search field to find the family and type of the element.
Enter a
 Name for the element.
This will become the element’s Panel Name property if it’s an Electrical Equipment, or its ACP_E_Fixture_ID property if it’s an Electrical Fixture.
Click the
 Place New button.
The Schedule Run window will be minimized.
Click the location in the view where you want to place the new destination element.
The new element will be placed and the raceway will also be added as a new row at the bottom of the Conduit Schedule of the ACP study, and assigned the next available Run ID.
The Schedule Run tool will ensure the ACP_C_Enabled property for any selected or placed elements is checked, to prevent the error Device disabled from appearing.
To schedule another raceway with a new Destination element, follow the steps in the next section.
Place additional Destination elements
Once the electrical element has been placed in the Revit model, the Schedule Run window will reappear so you can continue scheduling raceways with new destination elements. The details of the last raceway are retained in the window.
Follow the steps below:
Select the Source for the new raceway.
Or keep the last source used.
Open the view you want to use to place the new destination element.
The New radio button in the Destination section remains selected.
Use the
 and
and .png) buttons to decrease or increase the last character of the Name in sequence.
buttons to decrease or increase the last character of the Name in sequence.Or enter a new Name.
Click the Place New button.
The Schedule Run window will be minimized.
Click the location in the view where you want to place the new destination element.
The new element will be placed and the raceway will also be added as a new row at the bottom of the Conduit Schedule of the ACP study, and assigned the next available Run ID.
The Schedule Run tool will ensure the ACP_C_Enabled property for any selected or placed elements is checked, to prevent the error Device disabled from appearing.
Repeat the steps above to schedule more raceways with new Destination elements.