The ACP Workspace is the central hub for accessing, viewing, and managing projects, specifications and rule templates. When launching ACP, either via a web browser, or through the Revit add-in, users are taken to their ACP Workspace, which defaults to the Projects tab.
This guide provides an overview of the ACP Workspace, including detailed navigation, and functionality of each component.
Revit projects may be linked directly to an ACP project through the Revit Add-in, which would allow for that project to open as the default view each time ACP is launched from that Revit project.
Overall Workspace navigation
The ACP Workspace is organized into the following key sections:
.png) Top navigation bar
Top navigation bar.png)
View Name: Displays the Workspace name & logo, as well as the name of the tab and project the user is currently in.
.png) Feedback
Feedback
Give Feedback: An action button to send any feedback or report issues to ACP’s support team.
.png)
 Viewer
Displays the contents of the selected tab (Projects, Specifications, Rule Templates, etc.), and function within a given tab.
.png) Left sidebar
Left sidebar
Projects tab: Displays all active and completed projects, with sorting and filtering options.
.png)
Specifications tab: Lists available support specifications and allows for customized Support Specifications to be created.
.png)
Rule Templates tab: Allows users to view, create and edit Design Rule Templates for ease of application to studies.
.png)
About tab: Shows information about the version of ACP in use, the deployment URL, and a download link of the latest version of the ACP Revit Add-in.
.png)
Dark Mode toggle: Switches between light and dark theme settings, which persist across sessions.
.png)
Account Name: Displays the username associated with the account.
.png)
Logout button: Logs the user out of the current session of ACP.
.png)
Expandable Sidebar toggle: Expands or collapses the Left sidebar to show more or less information.
.png)
Projects tab .png)
Filters & controls
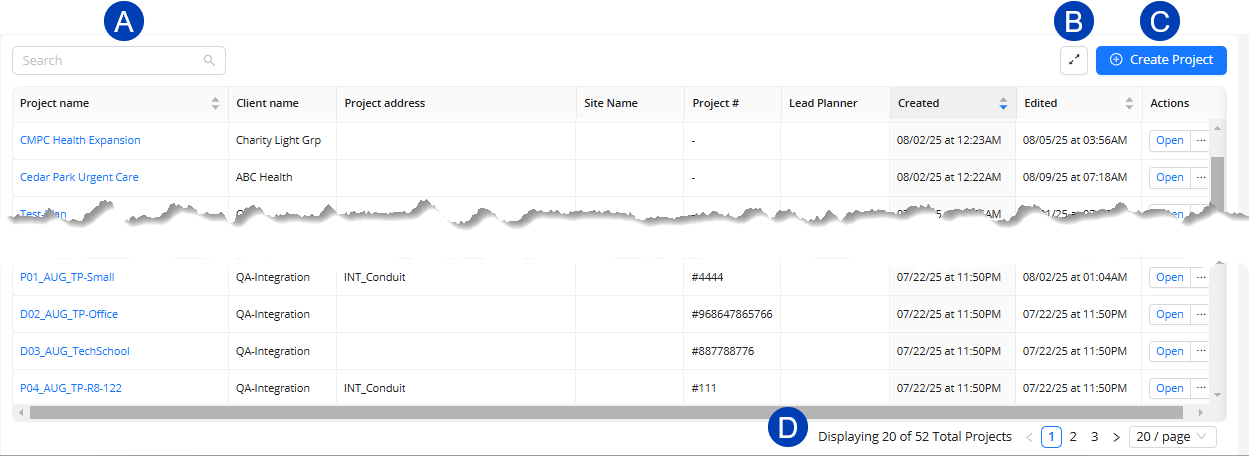
 Search: Displays projects with names containing or matching the entered text.
  Density toggle: Allows switching between Medium and Compact size of the Projects table.
 Create Project: Initiates the process of creating a new project.
 .png) Sorting: Sorts all rows in the table by either the ascending or descending order of the column’s values.
Sorting: Sorts all rows in the table by either the ascending or descending order of the column’s values.  Pagination: Determines the number of projects displayed per page (10, 20, 50, or 100 projects).
Projects table
.png)
Project Name: Displays the name of the project.
Client Name: Identifies the client for the project as entered by the user.
Project Address: Provides the location of the project site as entered by the user.
Site Name: Specifies the name of the project’s site.
This field can be used for large sites which need to be broken into smaller ACP projects.Project #: A user-specified identifier for the project.
Lead Planner: The primary person responsible for managing the project.
Created: Shows the date when the project was initially created.
Edited: Displays the most recent date when the project was modified.
Actions: Provides the ability to Open, Edit, or Delete the project. Edit & Delete appears upon hovering over the ellipsis.
.png)
Specifications tab .png)
Support Specifications are groups of supports which can be assigned to the entire site or to a specific Scope within the site when setting Design Rules within a Study.
These supports are used by ACP to evaluate the Revit model for supportability when choosing a path for the conduit runs.
 Folder Organization panel
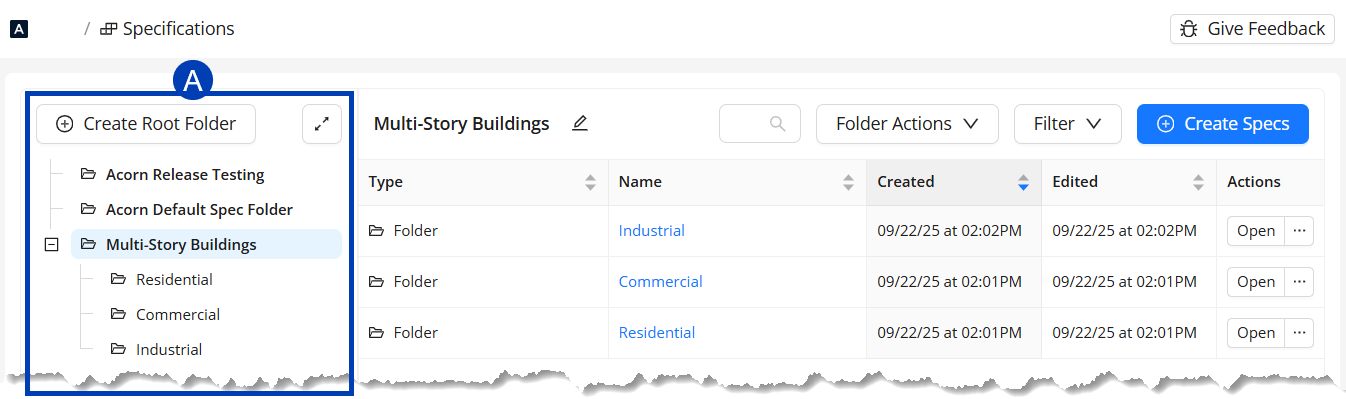
Create Root Folder: Allows users to Generate a primary folder in which to organize specifications.
.png)
Folder list: Displays folders, subfolders and specifications in a hierarchical folder arrangement.
.png)
Density toggle: Allows switching between Medium and Compact size of the Specifications table.
.png)
Filters & controls
Name: Displays the name of the specification or folder being explored.
.png)
Search: Displays the specifications and folders with names containing or matching the entered text.

Folder Actions: Provides the abilities to create a subfolder, duplicate the folder, or delete it.

Filter: Enables users to filter the table based on whether or not the listed items are folders or support specs.

Create Specs: Enables users to create a new specification.
.png)
Sorting: Sort all rows in the table by either the ascending or descending order of the column’s values.

Pagination: Determines the number of folders or specs displayed per page (10, 20, 50, or 100 projects).
.png)
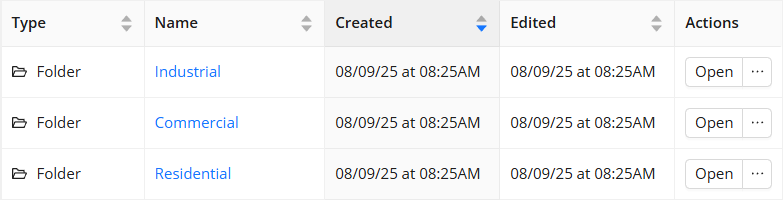 Specification table information
Type: Identifies the category of the item which is either Folder or Support Specification.
Folders - Organizes specifications into Root folders and Subfolders.
.png)
Support Specification (Support Spec) - A grouping of various supports which can be assigned to the entire site or to a specific scope of the site when we designate Design Rules within a study.
.png)
Name: Displays the folder or Support Spec’s name.
Created: Indicates when the folder or specification was created.
Edited: Shows the last modified date of the folder or specification.
Actions: Provides options to modify folders or specifications. Hovering your cursor over the ellipsis reveals the options:
Specification Interface Actions
This section identifies the functions found within the Folder Organization panel and Specification table actions.
Create Support Spec: Creates a new Support Spec within the folder.
Create Subfolder: Creates a new subfolder within an existing folder.
Open: Opens the folder or Support Spec.
Duplicate: Duplicates the folder or Support Spec.
Edit Folder/ Edit Support Spec: Renames the folder or Support Spec, respectively.
Move To: Moves the folder or support spec to a different folder or subfolder.
Delete: Deletes the folder or Support Spec.
Rule Templates tab .png)
Rule Templates allow the user to create a preconfigured set of Design Rules which can be applied to studies upon creation. This can be especially helpful for organizing the requirements of various building types, or save specific project requirements, so that the Design Rules don’t have to be set manually each time a study is created.
 Folder organization panel
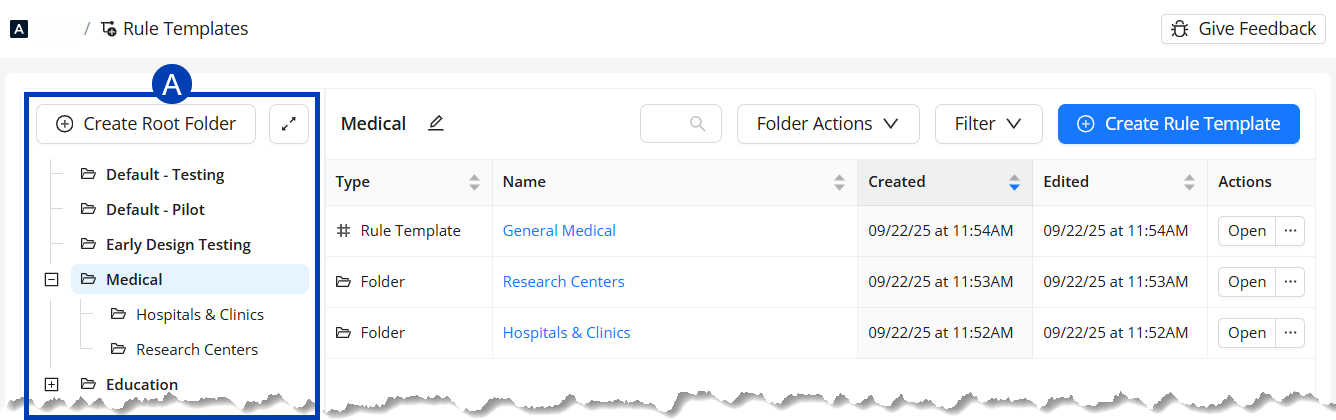
Create Root folder: Creates a primary folder in which to organize Rule Templates.
.png)
Folder list: Displays folders, subfolders and Rule Templates in a hierarchical folder arrangement.
Density toggle: Allows switching between Medium and Compact size of the Rule Templates table.
.png)
Filters & controls
Name: Displays the user-modifiable name of the rule template folder.
Search: Displays the rule templates with names containing or matching the entered text.
.png)
Folder Actions: Provides options to modify folders.
Filter: Filters the view based on whether or not the listed items are folders or Rule Templates.
Create Rule Template: Creates a new rule template configuration.
.png)
Sorting: Sort all rows in the table by either the ascending or descending order of the column’s values.
.png)
Pagination: Determines the number of folders or rule templates are displayed per page (10, 20, 50, or 100 projects).
 Rule Templates table information
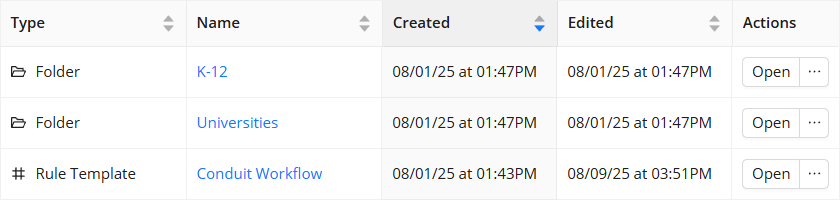
Type: Identifies the category of data being viewed which is either Folder or Rule Template.
Folder - Organize rule templates into Root folders and Subfolders.
Rule Templates - Predefined settings for Design Rules which can be applied to studies upon creation.
.png)
Name: Displays the title of either the Rule Template or folder.
Created: Indicates when the folder or Rule Template was created.
Edited: Shows the last modified date of the folder or Rule Template.
Actions: Provides options for the folder or Rule Template. Hovering your mouse cursor over the ellipsis reveals the options below:
Rule Template Interface Actions
This section identifies the functions found within the Folder Organization panel and Rule Template table actions.
Create Rule Template: (Folder Action Only) Creates a new Rule Template within the folder.
Create Subfolder: Creates a subfolder.
Open: Opens the folder or Rule Template
Duplicate: Duplicates the Folder or Rule Template
Edit Folder/ Edit Template: Renames the folder or Rule Template, respectively.
Move To: Moves the folder or template to a different folder or subfolder.
Delete: Deletes the folder or Rule Template.
About tab .png)
.png)
Download: Provides a link to download the latest version of ACP. Refer to Updating the ACP Revit Add-In for more information.
.png)
Current add-in version: Displays the version of the ACP add-in currently detected.
Version data is only available via the Revit add-in, and not when ACP is launched from a web browser.ACP Deployment URL: Indicates the URL where ACP is hosted for your organization.
Use the Copy button to copy and paste your URL into the Installing the ACP Revit Add-In, or into a web browser.
.png)
ACP Deployment version: Lists the current version of your ACP workspace.