Reviewing generated solutions is part of selecting and implementing the most appropriate conduit routing for your project. Before exporting to Revit, you can review solutions in the ACP Workspace using the 3D Solution Viewer. After Export, you can use Revit tools, both native and from the ACP add-in, to help with the process of reviewing and modifying the ACP Solution(s) in your Revit project.
View filters
View filters in Revit make it easy to highlight, hide, or apply custom graphics to specific elements within a view based on their properties. This helps you quickly identify elements that meet specific criteria.
Here are some ways you can use View Filters in reviewing and modifying ACP Conduit Solutions in a Revit project:
Manually create view filters to visually differentiate exported solutions
Use the Solution Inspection tool to automatically create view filters for ACP conduit parameters
Manually create view filters to visually differentiate exported solutions
When a conduit solution is exported from ACP into a Revit project, its Project, Study, and Solution # information are exported with it as a property in the ACP_C_Study_Information parameter. Using this information, you can create Visibility/Graphic Overrides in any view type, including plan, section, and 3D views. This lets you highlight the exported solution in the view where you apply the Overrides.
This can be useful when multiple solutions are exported into the Revit project, allowing you to visually compare them side-by-side or identify and merge parts of different solutions. You can create a View Filter Rule for each solution to assign overrides and visually distinguish runs from different solutions in a view.
Because View Filter overrides are view-dependent, you must apply the View Filter Rules separately (along with their overrides) to each view where you want to visually distinguish exported solutions.
.png)
Use the Solution Inspection tool to automatically create view filters
The Solution Inspection tool creates and applies temporary view filters to the active view to highlight parameters derived from the ACP Schedule Inputs. These parameters are Run ID, Source, Destination, Feeder ID, System, and Conduit Size.
As the view filters from the Solution Inspection tool are temporary, you can easily clear them from view. However, if preferred, you can also permanently apply the view filters to the view.
Applying multiple view filters to the same view may cause visibility conflicts as these are applied based on their hierarchy in Visibility/Graphic Overrides. To avoid this, create separate views for each use of the Solution Inspection tool, or each time you use a tool that creates and applies view filters such as the Convert Bends tool.
This section covers the step-by-step instructions on how to use the Solution Inspection tool.
 Choose the filter Settings
Open the Solution Inspection tool
 from the Other Tools panel in the Augmenta tab.
 Click the
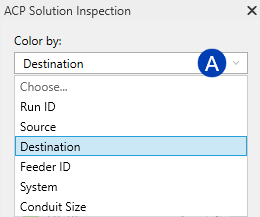
 Color By dropdown to select a parameter for which the Solution Inspection will automatically generate filters.
These parameters are taken from the Schedule Inputs such as Run ID, Source, Destination, Feeder ID, System, and Conduit Size.
This assigns a color for each unique property found in the elements visible within the view and displayed in the ACP Solution Inspection panel.
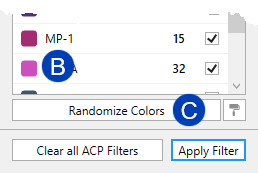 To change the assigned color, click the
  color swatch next to the property and select a new color from the Revit color palette.
Or click the
 Randomize Colors button at the bottom of the panel to assign new colors to each property.
With the ACP Solution Inspection panel open, review the various solutions in the view.
Use the visibility controls within the ACP Solution Inspection panel to adjust what appears in the view.
You can also use the Visibility/Graphic Overrides for the filters in the view.
To use this method effectively, any view template applied must be removed, or the temporary view properties
 must be enabled.

PRO TIP:
To select or isolate all of the elements filtered within a specific rule
Click on the desired data in the ACP Solution Inspection panel.
Right-click in the same row.
Choose one of the following options:
Select elements to select all conduit runs the rule applies to.
Isolate elements to isolate all conduit runs the rule applies to.
Apply temporary filters to the active view
Although the view filters created by the Solution Inspection tool are designed to be temporary, you can make these temporary view filters permanent so you can review the solution even when you exit the ACP Solution Inspection panel.
 To permanently apply the view filters to a view:
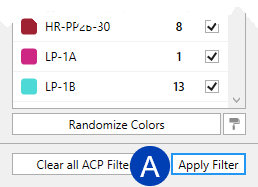
Select the
 Apply Filter button at the bottom of the ACP Solution Inspection panel.
 This will write the current rule to the Global View Filter list, as well as apply the overrides from the ACP Solution Inspection panel to the view.
Where are the View Filters applied?
View Filters created by the ACP Solution Inspection tool and their overrides are applied directly to the active view, unless a View Template is assigned to that view.
If a View Template is assigned, the filters and overrides are applied to the template instead.
Any view using that template will get the same filters.
If the same filter rule (created by the Inspect Solutions tool) is applied to different views (not as shared View Template), duplicate Global View Filters will be created for each view.
 Clear all ACP Filters from the Revit Project
The Solution Inspection tool creates view filters in every view where you click the Apply Filter button, which can lead to many filter rules being added to the project. The Clear all ACP Filters button removes the filter overrides from the view and deletes the corresponding filter rules from the Global View Filters in the Revit project.
Navigate to the view where the filter rules you want to delete have been applied.
Open the ACP Solution Inspection panel by clicking the Inspect Solutions tool
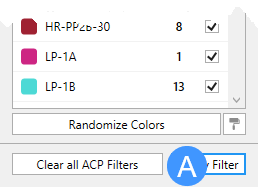
in the Other Tools panel of the Augmenta tab. 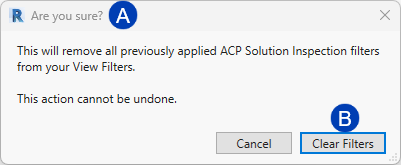 Click the
  Clear all ACP Filters button at the bottom of the panel.
 The
 Are you sure? dialog box will appear.
Click
 Clear Filters to remove the View Filter Rules from the project, as well as the overrides applied in the view.
 Or select Cancel to close the the window without removing the filters.

If you apply one set of view filters from the Solution Inspection tool, then apply a different set (for example, filters based on another parameter), the original view filter rules will stay in the project. You’ll need to delete them manually in the Global View Filters window.
It’s best to Clear all ACP Filters
from a view before changing the parameter under Color By in the ACP Solution Inspection panel. This is especially important because you can’t create a schedule for View Filters.
Revit Schedules
Revit Schedules are a powerful way to review the values of specific parameters for model elements. They are organized by category and can be created for the categories of Conduits, Conduit Fittings, or Conduit Runs.
There are two kinds of conduit systems: with Fittings and without Fittings. Using a conduit type, created under the without Fittings system, lets you schedule each conduit run from end to end, showing the total length of each run and common properties for the full run.
Since this is the preferred workflow for most users, the ACP Conduit Run Schedule is automatically created during the ACP Initialization process.
For more details on this schedule and how to use it to review and adjust your conduit solution, see Working with the ACP Conduit Run Schedule.