The scope of the Revit model imported into ACP as part of your Study’s Design Inputs is determined by the Section Box in the ACP-Import view which expands to the full model extents by default. If the scope is too large or too small, routing issues may occur when generating solutions in ACP.
Scope-related routing issues must be resolved before moving to other potential causes for the following reasons:
Scope issues affect both Background Geometry and Electrical Model.
Routing issues will persist if Scope issues remain unresolved, even if there are no issues in the models.
Scope issues are usually the easiest to identify and resolve.
Because they are straightforward to fix, addressing them first saves time and prevents unnecessary troubleshooting of other inputs.
Routing issues linked to the Scope are outlined in the table below.
Issue | Failed Solution/Other | Unrouted Runs | Odd Routing |
|---|---|---|---|
✘ | |||
✘ | ✘ | ✘ |
This article covers the issues and how to resolve them when the scope is too large or too small.
Scope too large
The scope of the Revit model imported into an ACP study as Design Inputs is defined by the Section Box in the ACP-Import which expands to the full model extents when the view is created. ACP analyzes all occupied and available space within the entire site, including empty space outside the building. The larger the site, the longer it takes for ACP to process the study and generate solutions.
PRO TIP: Check for rogue geometry in the linked files.
If the Section Box is larger than the model extents, ACP automatically adjusts the scope to 5’ from the visual elements of the site, including site geometry, topography, and similar elements.
Rogue geometry in the Revit model or linked files inflates the model extents, preventing ACP from automatically adjusting the scope down.
.png) What it may look like in ACP
What it may look like in ACP
If the scope of the site is too large, ACP’s processing time may increase exponentially and, ultimately, cause failure to generate solutions. In this case, the Status of the study will change to Failed.
Resolving the Issue
The Section Box may be used to limit the scope of the model imported into ACP. Cropping the model reduces the amount of geometry ACP needs to analyze, which helps speed up solution generation and lower the risk of failure.
The extents of the ACP-Import View Section Box may be modified in one of two ways:
.png) Without a Scope Box assigned to the view, the Section Box may be manually moved and resized.
Without a Scope Box assigned to the view, the Section Box may be manually moved and resized.
To move the Section Box, select its boundary then drag to the preferred location.
To resize the Section Box, select its boundary then use the pull points (such as
 ) in each face for adjustment.
The Section Box is enabled
in the ACP-Import view by default, but may be disabled if careful attention is not taken. Ensure that the Section Box is enabled and/or a Scope Box is assigned to the view.
Scope Boxes may be created for different model regions and alternately assigned to the ACP-Import view to process each one separately.
Follow the steps below to create a Scope Box and assign it to the ACP-Import view.
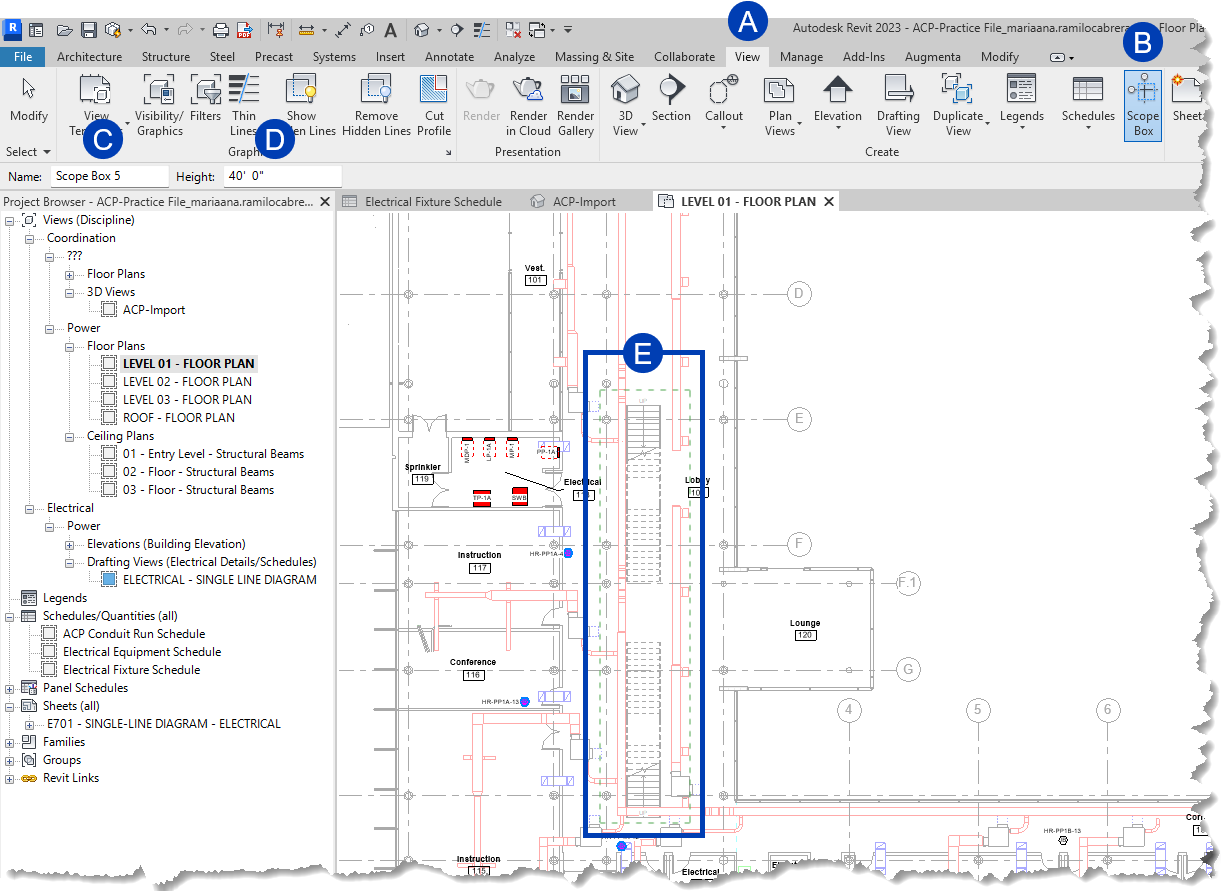 Create a Scope Box
Open the plan view in which you want to create a Scope Box.
Scope boxes can only be created in plan views.
Navigate to the
 View tab in the ribbon.
Select the
 Scope Box tool within the Create panel.
On the Options Bar, specify the
 Name and
  Height for the scope box
Scope Boxes can extend between floors.
A default Name will be assigned to the Scope Box if you don’t specify one, but it’s recommended to give it a descriptive name to easily reference it.
To draw a scope box, click in the view where you want to place the Scope box and drag to enclose the
 area you want.
 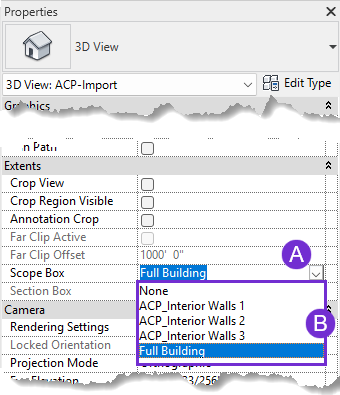 The scope box will display as a green dashed line around the boundary.
Click again to finish placing the scope box.
Assign a Scope Box to the ACP-Import view
Open the ACP-Import view.
In the Properties palette, click the
 dropdown for Scope Box.
Select from the
 options.
Scope too small
The Section Box limits which elements are imported into ACP. If any element used in solution generation is outside of the Section Box, it will not be imported into ACP. This may cause unrouted runs and/or odd routing.
The elements which must be within the Section Box include:
Sources
Destinations
Supporting Elements - Such as floors, walls, etc.
Off-Axis Mass
The entire Off-Axis Mass must be within the Section Box. Otherwise, the change in orientation will not be recognized and ACP will route conduits in the off-axis area following the same orientation as the rest of the site, resulting in inefficient routes.
Scope Boxes used as Design Rules scope
This will not prevent routing. However, any Scope Box outside of the Section Box can’t be assigned as a Scope for Design Rules.
What it may look like in ACP
 Prior to solution generation
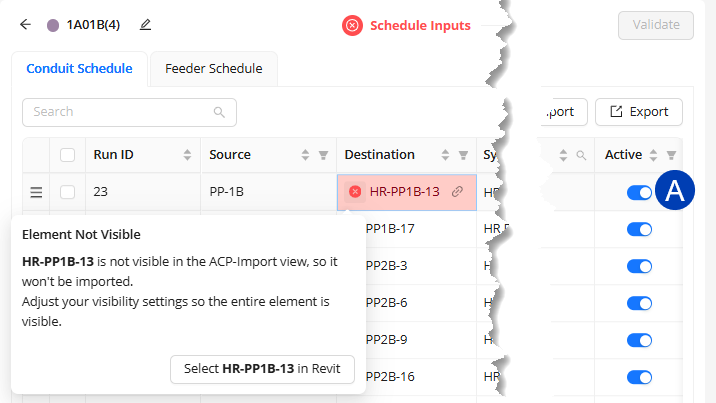
Because the ACP Conduit Schedule connects live with the active Revit project, any Source or Destination missing from the ACP-Import view will be highlighted with the Element Not Visible error. This may be caused by the following:
The element is located outside of the Section Box.
This applies if the Section Box is smaller than the model extents.
The element is hidden from view in the ACP-Import view.
All errors in the Schedule Inputs must be resolved prior to Validating the study for solution generation. This serves as a safeguard to minimize routing issues linked to missing Sources and Destinations due to the scope being too small.
Active toggle to deactivate it.
This resolves the error without deleting the raceway, avoiding the need to track multiple versions of your ACP Conduit Schedule.

Unrouted Runs
When reviewing Unrouted Runs, the Explored Space may cover the entire site. If you visualize Supportable Volumes using View Controls but none of the Explored Space becomes highlighted, the cause of the Unrouted Run is likely the lack of supportable elements.
Odd Routing
If an Off-Axis mass has been clipped or cropped completely out of the Section Box within the ACP-Import view, it will no longer impact the orientation of the conduit routes in that area. Instead, ACP will route conduits in the off-axis area following the same orientation as the rest of the site, resulting in odd routing behaviors.
Resolving the Issue
Routing issues related to the scope being too small may be resolved by ensuring that the necessary element is fully within the Section Box.
To do this, you may do the following:
Modify the extents of the ACP-Import view Section Box to include the element.
Manually adjust the Section Box boundaries, or assign a Scope Box to the view (See previous section).
Move the element so it’s within the Section Box.
This is only applicable to elements which may be moved without altering the structure of the building such as Electrical Equipment and Electrical Fixtures.