By default, a newly created Design Rule in ACP is applied across the entire site. This means that Design Rules like Spacing, Clearance, or Raceway Height will affect routing in uniformly across the site within the Study. However, in many cases, different areas throughout the model require customized rule applications.
When this happens, users can assign smaller scopes to additional Design Rules, allowing for more precise guidance over conduit routing.
For example:
A higher raceway height may be needed in a specific corridor.
A tighter conduit spacing may be required in confined mechanical rooms.
Clearances around obstacles may vary based on area usage.
Scopes may be established using any of the following methods:
This guide walks through the process of preparing and applying scopes to Design Rules.
Spaces, Scope Boxes and Area Classes are imported with the Electrical Model. If any data related to these items change within the model, the model should be re-imported. The Systems data is defined in the Conduit Schedule and is updated whenever new inputs are created there.
Types of Scope
Spaces
Spaces are a Revit-native analytical element which defines a bounded region within the Revit model. Because Spaces can be assigned to Rooms, they should be placed directly in the Electrical Revit model. This allows for better coordination and enables the use of that information in ACP scope settings for design rules. For detailed instructions on creating and managing Spaces, refer to Creating Revit Spaces.
Area Classes
Area Classes are Revit Spaces grouped together using the ACP_Area_Class parameter which is added to the Revit project during initialization.
Assign Area Classes in Revit
To assign an Area Class to a Revit Space(s)
.png) In a floor plan view, select one or more Spaces to be added to an Area Class.
In a floor plan view, select one or more Spaces to be added to an Area Class.In Revit’s Properties Palette, find the ACP_Area_Class parameter, and assign the desired Area Class property to the space.
Option A: Add Space(s) to an existing Area Class
Select an Area Class from the pulldown list.
Option B: Create a new Area Class
Enter the name of the new Area Class in the text box.
The new Area Class will be available within the pulldown list in the future.
Scope Boxes
Scope Boxes are Revit-native elements that define a three-dimensional model region, independent of Rooms or Spaces.
Create scope boxes
.png) Scope Boxes may only be created in Plan Views. Follow the steps below:
Scope Boxes may only be created in Plan Views. Follow the steps below:
With the plan view open, navigate to the
 View tab in the ribbon.
Select the
 Scope Box
  tool within the Create panel.
On the Options Bar, specify the
 Name and
  Height for the scope box
Scope Boxes can extend between floors.
To draw a scope box, click in the view where you want to place the Scope box and drag to enclose the
 area you want.
 The scope box will display as a green dashed around the boundary.
Click again to finish placing the scope box.
PRO TIPS:
Naming each scope box within the Revit model makes identifying targeted scope areas easier in ACP.
Pinning each scope box will assure it does not get accidently adjusted more moved while your team works in the Revit project.
Scope boxes may be modified within a 3D or section view, which is especially useful for adjusting their height.
Systems
The Systems data is defined in the Conduit Schedule which is one of the Schedule Inputs in an ACP Study. Only the Clearance and Raceway Height design rules may be applied to this type of Scope. For example, the Raceway Height Design Rule may be set to the System of EM POWER conduits, separate from standard POWER conduits.
.png) Assign a Design Rule to a Scope
Assign a Design Rule to a Scope
To assign a Design Rule to a Scope:
In the
 Design Rules sub-tab of a Study view, add a new design rule or select an existing one.
Click the
 Scope dropdown.
Select the preferred Scope type from the
 options.
All
 available scope for the selected type will be displayed on the right of the dropdown.
Select the Scope.
 (Optional for Clearance and Raceway Height design rule types) choose the target system within the selected Scope by selecting from the
  Systems dropdown.
All changes are saved automatically.
Scope hierarchy
Different Design Rules may be assigned to multiple overlapping Scopes. For example: a design rule may be assigned to a Revit Space which is grouped with other spaces with the Area Class, and to which separate design rule is assigned. In these cases, ACP follows a clear set of rules to determine which design rule will apply in that context.
ACP resolves competing scopes using two rules:
Rule 1: Scope nesting: When one scope is entirely contained within another.
Rule 2: Priority ranking (P1, P2, P3): When scopes partially overlap.
Rule 1: Scope nesting (smaller scope wins)
If one scope is entirely contained within another, regardless of whether it is a Space, Scope Box or Area Class, the smaller scope will take precedence for any design rule applied within its boundaries.
Examples:
.png)
 Where a Scope Box fits entirely within a space, the design rules assigned to the scope box takes precedence within its area, while the rules assigned to the space is applied to the remaining area.
 Where a Space fits entirely within a Scope Box, the design rules assigned to the Space takes precedence within its area, while the rules assigned to the Scope Box is applied to the remaining area.
 Where a Scope Box fits entirely within another Scope Box, the design rules assigned to the smaller Scope Box takes precedence within its area, while the rules assigned to the larger Scope Box is applied to the remaining area.
Rule 2: Priority ranking (applies only where scopes partially overlap)
If two scopes partially overlap, i.e., neither is fully nested within the other, ACP resolves precedence based on the Priority setting (P1, P2, P3) of the associated design rules.
) for the Priority number to show.
Examples:
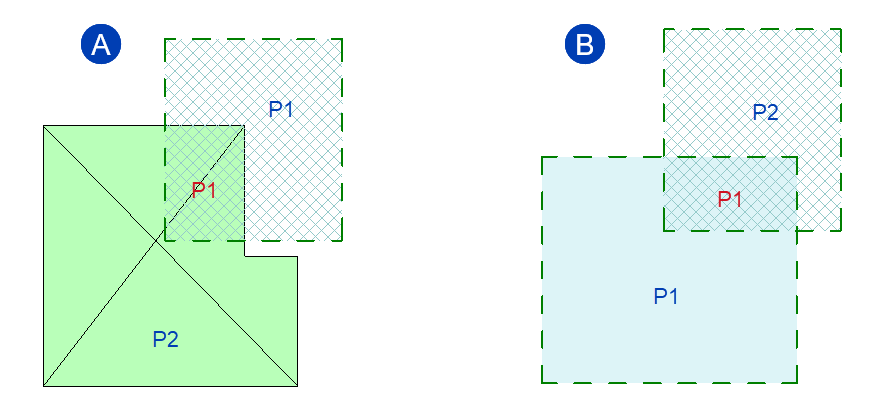
 If a Scope Box is assigned as a P1 scope, and it overlaps with a Space assigned to the P2 scope; the area of overlap will follow the Design Rule assigned to the scope box since it is the P1 scope (which take precedence over P2).
 If two overlapping Scope Boxes are assigned as P1 and P2, the area of overlap will follow the Design Rule assigned to the P1 scope (which take precedence over P2).
Assigning Priority Rankings
.png)
Navigate to the Design Rules for your study. Then find the design rule category you want to modify.
Click the checkbox next to each Design Rule to enable in it within the study.
This also assigns the priority for that rule.
The order in which you activate the rules
also determines the initial priority ranking.
Changing priority rankings
Adjust which design rule takes precedence by reordering the hierarchy within the Design Rule list.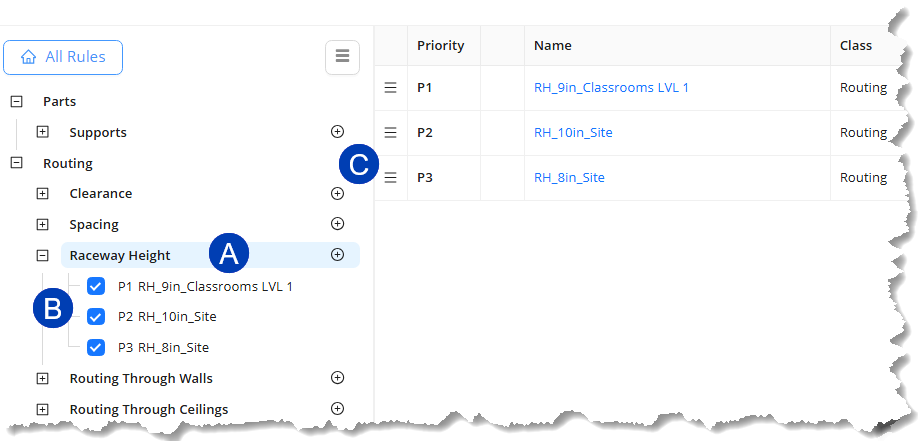
Click the
 design rule type for which you want to reorder the priority of design rules.
 In the table on the right, a list of the Design Rule appears.
Check that
 priority rankings are assigned to the Design Rules.
In the table on the right, click and drag the grab
 the three lines
  in the left column to move the design rule up or down to the preferred priority rank.