The Guidance tools are placed in the Revit project to guide the ACP-routed conduit based on the specific routing needs and preferences for that project. There are two types of routing tools: Guidance Boxes and Guidance Spaces.
Guidance Boxes
Each of the Guidance Box type is a variation of the same Generic Model family, with each type controlling a specific function within ACP.
Refer to the table below for information on each routing box type.
Guidance Box Type | Function | Use Case(s) |
|---|---|---|
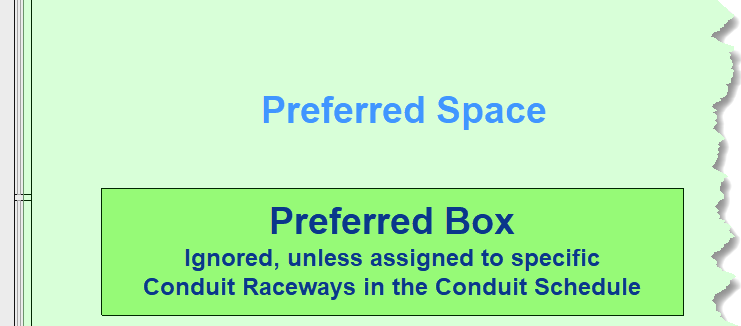
Preferred Box | Directs ACP to prioritize routing through the box volume when applicable, while maintaining flexibility to navigate around obstructions and continue to final destinations. | Providing additional guidance and context for specific project requirements. |
Specific conduit runs may be forced to route within the box by assigning the Run ID in the Conduit Schedule to the Named Preferred Box. | More accurate control over conduit heights within specific areas of a project. | |
May Route Box | Allows conduits to route through obstructions, such as walls, ducts, floors, pipes or roofs. | Routing conduits between rooms or levels where physical barriers exist. |
Creating a path through content from other models that are known to be in the process of being changed by the team. | ||
Keep Out Box | Prevents ACP conduits from routing within the volume of the box. However, ACP may route through keep out boxes in order to connect to a source or destination within. | Areas which look available, but where conduits should not be run, like stairwells, elevator shafts, or large open atriums. |
Placing Guidance Boxes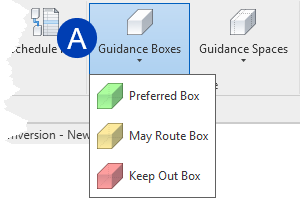
Guidance Boxes can be placed in the model using both floor plan and 3D views by following the steps below.
Open the floor plan or 3D view to be used to place the Guidance Box in the model.
Navigate to the Augmenta tab in the Revit ribbon.
Select a Guidance Box type from the
.png) Guidance Boxes dropdown in the Guidance panel.
Guidance Boxes dropdown in the Guidance panel. Click the area(s) where you’d like to place the Guidance Box.
Configuring Guidance Boxes
All Guidance Boxes must be properly sized and placed prior to importing the Electrical Model and Background Geometry into ACP.
Adjusting the Guidance Box dimensions
The Guidance Boxes are a generic box family. The dimensions can be adjusted using either of the two methods below:
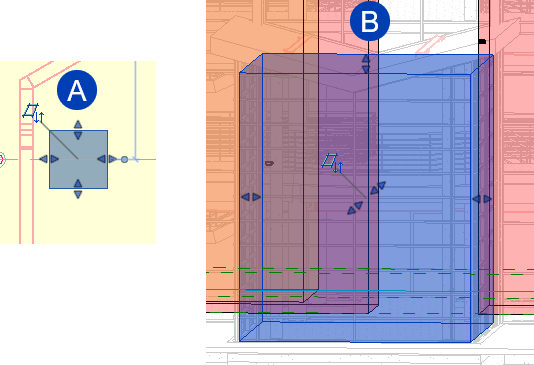 The pull points of the Guidance Boxes are visible in both the floor plan and 3D views. In
 ![]() floor plan view, the pull points exist on all four sides while it only exists in five of the six sides in
floor plan view, the pull points exist on all four sides while it only exists in five of the six sides in ![]() 3D view.
3D view.
Open the model in either floor plan or 3D view.
Select the Guidance Box.
Adjust the pull points as needed
The final volume of the Guidance Boxes within ACP is impacted by the Grid Resolution set in the Study, as their properties will extend to fill any grids they are in.
This method can be used in both floor plan and 3D views.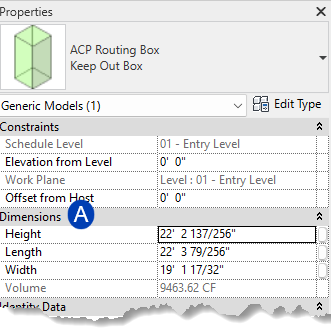
Select the Guidance Box.
In the Properties panel, locate the
Dimensions section.Adjust the property of the Height, Length, and Width parameters as needed.
Adjusting the Guidance Box elevation
Guidance Boxes are placed at an Elevation from Level of 0’ 0” by default. This can be changed by using either of the two methods below:
Open a Section view or 3D view showing the box.
Select the Guidance Box.
Use the Move
.png) command, or your arrow keys
command, or your arrow keys .png) to adjust the elevation of the guidance box.
to adjust the elevation of the guidance box.
3D views may be more difficult to work in because it can be challenging to know which of the three planes you are currently referencing. To help with this, use the View Cube to look straight on at any of side of the guidance box prior to trying to move it up or down within the view.
This method can be used in both floor plan and 3D views. 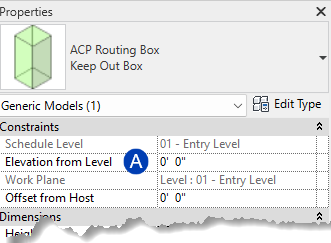
Select the Guidance Box.
In the Properties palette, locate the
Elevation from Level parameter.Enter you preferred elevation for the bottom of your Guidance Box.
Press Enter on your keyboard or click into the view.
Assigning a Preferred Box to a Run ID to force routing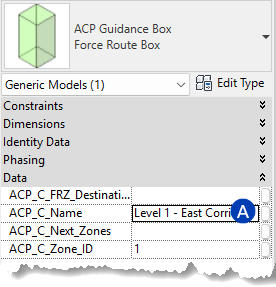
Preferred Boxes may be assigned directly to a Raceway through the Run ID to force any conduit runs associated with that Raceway to route through that specific Preferred Box. These boxes must be named before you will be able to select them for forced routing.
Name the Preferred Box (in Revit Project)
From your Revit Project, select the preferred box you want to name.
Specify a name in the ACP_C_Name property.
Assign the named Preferred Box to the Raceway (in the ACP Study)
Navigate to the Conduit Schedule within the study.
.png) Locate the appropriate Raceway by finding it’s corresponding Run ID.
Locate the appropriate Raceway by finding it’s corresponding Run ID. In the Guidance field for that Run ID, click into the dropdown list.
A list will drop down displaying all named Preferred Boxes.
Select the correct Preferred Box from the list of available named boxes.
If more than one Preferred Box is assigned to the same Run ID, ACP chains them together in the order they appear in the Conduit Run Schedule as shown.
Guidance Spaces
Guidance Spaces utilize the volume of Native Revit Spaces to specify areas where conduit routing should be prioritized, avoided, through the ACP_C_Preferred and ACP_C_Keepout parameters.
Refer to the table below for information on each Guidance Space type.
Guidance Space Type | Function | Use Case(s) |
|---|---|---|
Preferred Space ACP_C_Preferred | When multiple routes are possible, Preferred Space tells ACP to choose a route that runs through this space.
| Providing additional guidance and context for specific project requirements. |
Encourage routing through main corridors or bulk rack areas. | ||
Keep Out Space ACP_C_Keepout | Prevents ACP conduits from routing within the volume of the specific Revit Spaces.
| Spaces which look available, but where conduits should not be run, such as stairwells, elevator shafts, or large open atriums. |
Assigning Guidance Spaces
There are two ways to assign spaces as preferred: using the add-in tool or the ACP_C_Preferred & ACP_C_Keepout parameters.
.png) Open the floor plan view where the spaces are visible.
Open the floor plan view where the spaces are visible. Under the Augmenta tab, within the Guidance panel, select the Guidance Spaces dropdown
.png) .
. Select either Preferred Spaces
.png) or Keep Out Space
or Keep Out Space.png) .
.You are then prompted to select the spaces you’d want to set as Preferred/Keep Out.
.png)
Select one or more spaces.
Hold down the Ctrl key to select two or more spaces.
.png)
Click
Continue. The window displays a list of spaces selected in the previous step.
Verify that the list is correct, then select
.png) Confirm.
Confirm.If the list is not correct, select Cancel and restart the process.
.png) Select the space(s).
Select the space(s). Navigate to the Properties Panel.
Check the box for the ACP_C_Preferred or ACP_C_Keepout parameters so that the property is set to Yes
.png) .
.
Removing Guidance Spaces
There are two ways to unassign space(s) as preferred: using the add-in tool or the ACP_C_Preferred & ACP_C_Keepout parameters.
.png) Open the floor plan view where the spaces are visible.
Open the floor plan view where the spaces are visible. Under the Augmenta tab, within the Guidance panel, select the Guidance Space dropdown
. Select the Clear Guidance Spaces
.png) tool.
tool. The
.png) Guidance Spaces dialog box will appear.
Guidance Spaces dialog box will appear.
Select one or more spaces which has previously been set as Preferred or Keep Out.
Select Continue
.png) .
. The window displays a list of spaces you selected in the previous step.
.png)
Verify that the list is correct, then select Confirm
.png) .
. If the list is not correct, select Cancel and restart the process.
.png) Select the space(s).
Select the space(s). In the Properties panel, uncheck the box for the parameter(s):
ACP_C_Preferred
ACP_C_Keepout
Visualizing the Guidance Spaces
To help visualize the spaces designated as Preferred or Keepout, ACP automatically creates the ACP-Plan view template when you initialize your Revit project. Since spaces are only visible in 2D views (such as plans and sections), the template is filtered as [Floor Plans, Structural Plans, Area Plans], though it can be applied to any compatible view.
This view template has several overrides to make working with ACP easier in a plan view, but includes three View filters specific to the Guidance Space workflow.
They are:
ACP Keepout Spaces Filter - Highlights in red any space having its ACP_C_Keepout property set to YES
.ACP Preferred Spaces Filter - Highlights in green any space having its ACP_C_Keepout property set to YES
.ACP Unassigned Spaces - Highlights in gray any space having neither parameter is set to YES
.
For more information about the ACP-Plan view template click here.
Overlapping Guidance tools
When using the Guidance tools, there may be cases where multiple Guidance elements overlap or intersect within the routing environment. In these situations, ACP follows a defined set of rules to determine how routing priorities are resolved. Guidance Boxes and Guidance Spaces of the same type follow the same underlying rules, so routing behaves consistently regardless of which form is used. Both types define boundaries, preferences, and exclusions in the model, and their behavior is identical in practice. (For example, placing a Keep Out Box ![]() or a Keep Out Space
or a Keep Out Space ![]() produces the same routing outcome.)
produces the same routing outcome.)
This section outlines the rules that Guidance elements follow when overlapping with the same and different type. It also covers how routing priority is resolved when a Keepout element overlaps with Clash-Free Boxes which are non-guidance elements with a behavior similar to May Route Boxes.
 Overlapping Guidance elements of the same type
When Guidance elements of the same type overlap, their regions merge rather than creating additional priority. This means the larger combined region is used during routing. For example, if a Preferred Box is placed within a larger Preferred Space, ACP treats the entire volume of the Preferred Space as the active region.
Overlapping Guidance elements of different types
In addition to the same types of guidance tools overlapping, guidance tools of different types may overlap as well. When this happens the general prioritization followed is:
This may not always be the case. The following sections further discuss how priority of Guidance elements are evaluated when they overlap with one another.
May Route VS Keepout elements
Elements which penetrate obstructions are always prioritized as long as they can be reached. For example, a May Route Box running entirely through a Keepout element (creating an obstruction) allows conduit to route through that area  . Keep in mind that there should be an unobstructed path to reach the May Route Box. If it’s inaccessible, such as when it’s completely enclosed by a Keep Out Element
  , routing will be blocked.
.png)
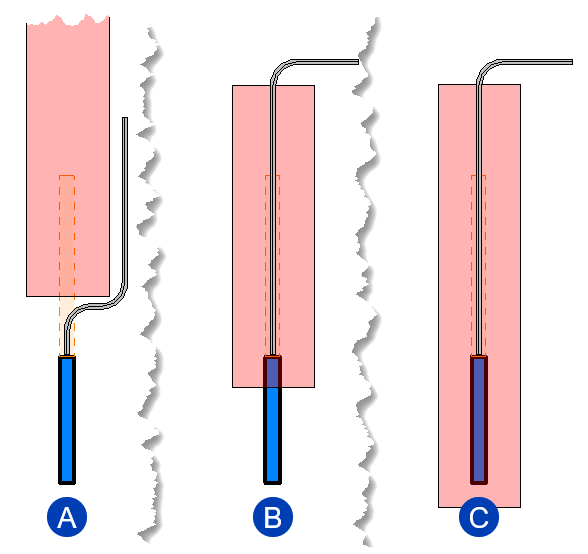
May Route AND Preferred elements
.png) Preferred elements greatly influence ACP conduit routing, but they do not create the penetrations needed to ensure routing through obstructions or Keepout elements. As a result, preferred routes may still be blocked by walls, floors, or trade elements.
Preferred elements greatly influence ACP conduit routing, but they do not create the penetrations needed to ensure routing through obstructions or Keepout elements. As a result, preferred routes may still be blocked by walls, floors, or trade elements.
To penetrate obstructions blocking the preferred path, May Route Boxes must be used. A May Route Box may be layered with Preferred elements when routing encounters an obstruction to allow conduit to pass through  . The May Route Box does not alter the properties of Preferred elements in any way; it only provides a path through the blocking obstruction.
Keepout VS Preferred elements
.png) While Preferred elements greatly influence ACP conduit routing, they do not create the penetrations needed to ensure routing through Keepout elements which act as obstructions. Therefore, a Preferred box blocked by a Keepout element may not be used because the path is blocked.
While Preferred elements greatly influence ACP conduit routing, they do not create the penetrations needed to ensure routing through Keepout elements which act as obstructions. Therefore, a Preferred box blocked by a Keepout element may not be used because the path is blocked.  . To allow routing, the Preferred box must be layered with a May Route Box, which will clear a path through the Keepout element
  .
.
A space may be marked as both Keep Out and Preferred. In this case, the Keepout property will be prioritized. This behavior is reflected in the hierarchy of the Guidance Space view filter.

Keepout VS Clash-Free Boxes
 Clash-Free boxes penetrate most of the same obstructions as a May Route Box does. They’re attached to the top and bottom of most electrical elements enabled for the ACP workflow (see the About electrical element data for ACP article for more info).
At times these Clash-Free may overlap a Keepout element. When this happens, the routing behavior will depend on the location of the physical geometry of the Electrical Element, rather than the placement of the Clash-Free box within the Keepout area.
 If a Keepout element overlaps with the Clash-free box but doesn’t enclose the electrical element at all, ACP will respect the Keepout element. Meaning it will only route through the part of the Clash-free box that doesn’t overlap with the Keepout element.
The Keepout element will be ignored and routing will go through the overlapping Clash-free box if:
 The Keepout element encloses the electrical element partially.
 The Keepout element fully encloses the electrical element.